- Developers
- Professional Navigation for Fleets
- Android
- Getting started
- Embedded integration using Xamarin
Embedded integration using Xamarin
Introduction
In the following we will guide you through creating a simple Android application with embedding Sygic navigation engine through window in window style.
In this example we will develop a simple application, where you can type in an address string and through a custom button you can start navigation to that address.
Prepare your working environment
For being able to compile your application you need to have Visual Studio (2013 or newer) extended with Xamarin.Android module on your computer. If you don't have it please follow Installation of Xamarin.Android for Windows.
As the key point you need to Download and Install SDK library on your computer.
You may want to install the Sygic navigation on your device in advance. Check Installation of navigation. You will definitely need it at later stages when you want to test your application on device.
Check Run Demo Example.
Create new project
Let's start Visual Studio (2013 or newer) and create the new solution through selecting New Project -> Visual C# -> Android -> Blank App (Android).
Let's define Solution name as XamarinInteg3D and Project name as App3D.
The project is automatically populated with several files, while these are relevant:
- MainActivity.cs, which is the placeholder for the application coding
- Resources/layout/Main.axml, which will define graphical look of application
The source code (MainActivity.cs) should be generated as follows:
using System;
using Android.App;
using Android.Widget;
using Android.OS;

namespace App3D
{
   public class MainActivity : Activity {

      protected override void onCreate(Bundle bundle) {
          base.onCreate(bundle);
          setContentView(Resource.Layout.Main);
      }
   }
}
The layout resource (Main.axml) should be generated as follows:
<?xml version="1.0" encoding="utf-8"?>
<LinearLayout xmlns:android="http://schemas.android.com/apk/res/android"
    android:orientation="vertical"
    android:layout_width="fill_parent"
    android:layout_height="fill_parent">
</LinearLayout>
Include Sygic library
Including Sygic SDK library consists of four steps:
-
add new project named SygicLibBinding within the existing solution
through New Project -> Visual C# -> Android -> Binding Library (Android)
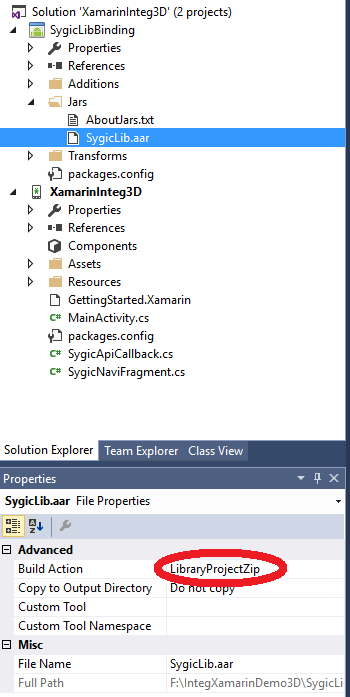
The project will automatically create a project folder structure in the filesystem under the XamarinInteg3D solution exposing Jars folder -
copy SygicLib.aar from the downloaded SDK package to project's Jars folder
The aar file is located within the SDK package inside the SDK/Lib/3d.ipc folder. -
add SygicLib.aar as an existing item into the Jars folder
-
set Build Action property to LibraryProjectZip by opening SygicLib.arr properties
-
add SygicLibBinding reference for the App3D project through Add Reference
After successful solution setup the project should have the following appearance in Visual Studio:
- copy Transforms/Metadata.xml from demo project to your project
- select architecture supported by the used SygicLib.arr (e.g. armeabi-v71) through
Open project properties -> Android Options -> Advanced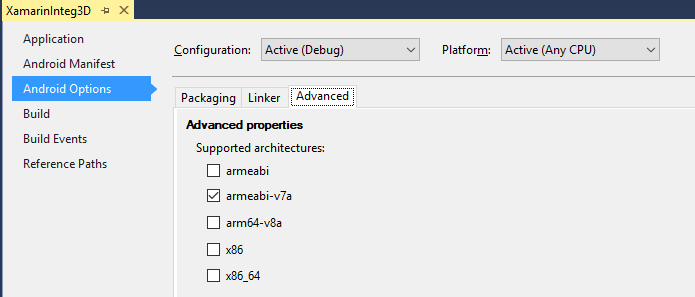
If you are integrating Sygic Truck 13.9.5 and lower
Right click to your project selecting Manage NuGet packages to add the following NuGets to project:
- Xamarin.Android.Support.v4
- Xamarin.GooglePlayServices.Location
- Xamarin.Kotlin.StdLib
- Xamarin.Android.Support.v7
- Xamarin.Android.Support.Animated.Vector.Drawable
If you are integrating Sygic Truck 13.9.6 and higher
If you are integrating Sygic Truck 13.9.6 and higher, project is migrated from Android support library to AndroidX, so you need to add different NuGet packages.
At the moment of writing this, NuGet packages were not available in „Manage NuGet packages“ view, but it’s possible to find them here https://www.nuget.org/
and install them using Package Manager Console, following the instructions, for example :
Install-Package Xamarin.AndroidX.Core -Version 1.0.1-preview02Add the following NuGets to project :
- Xamarin.AndroidX.AppCompat
- Xamarin.AndroidX.Legacy.Support.V4
- Xamarin.AndroidX.Migration
Define graphical look
As an example of the window-in-window look we can prepare the layout in such a way, that it splits the screen into 2 segments,
one, which defines the UI interface for address input (Editext edit1) and the button, which triggers the navigation(Button btnSearch)
second, which prepares placeholder for Sygic navigation pannel (fragment fragment_sygic).
Thus we can modify the default generated layout to the following form
<?xml version="1.0" encoding="utf-8"?>
<LinearLayout xmlns:android="http://schemas.android.com/apk/res/android"
    android:orientation="vertical"
    android:layout_width="match_parent"
    android:layout_height="match_parent">

  <Button
    android:id="@+id/btnSearch"
    android:layout_width="wrap_content"
    android:layout_height="wrap_content"
    android:text="Search"
    ></Button>

    <fragment
        class="XamarinInteg3D.SygicNaviFragment"
        android:id="@+id/fragment_sygic"
        android:layout_width="match_parent"
        android:layout_height="match_parent" ></fragment>
</LinearLayout>
Modify AndroidManifest.xml
Add the following lines to AndroidManifest.xml:
- to add services
<service android:name="com.sygic.aura.SygicNaviService" ></service> <service android:name="com.sygic.aura.SygicService" ></service> <service android:name="com.sygic.aura.feature.gps.LocationService" ></service> - to add application permissions
<uses-permission android:name="android.permission.WRITE_EXTERNAL_STORAGE" ></uses>
<uses-permission android:name="android.permission.ACCESS_FINE_LOCATION" ></uses>
<uses-permission android:name="android.permission.READ_PHONE_STATE" ></uses>
<uses-permission android:name="android.permission.INTERNET" ></uses>
Code the application
The following four modifications steps are minimum to be applied:
- define Sygic navigation UI framework by extending MainActivity class
- add SygicNaviFragment class into applicatiom
- add SygicNaviCallback class into application
- add Sygic API call to allow for navigation operation
- optionally add application permissions (required for API version 23 and higher)
Please check Permissions management
1. Define navigation UI framework
The following code is the typical framework to pick when starting to write an application using Sygic Window in Window mode.
The function initUI() instantiates Sygic navigation fragment and passes it into Fragment manager.
The Sygic navigation then requires that the methods (onCreateDialog, onPrepareDialog, onActivityResult, onNewIntent, onKeyUp, onKeyDown) are overriden with the code bellow.
public class MainActivity extends AppCompatActivity
{
    private SygicNaviFragment fgm;

    @Override
    protected void onCreate(Bundle savedInstanceState) {
        super.onCreate(savedInstanceState);

        if(PermissionsUtils.requestStartupPermissions(this) == PackageManager.PERMISSION_GRANTED)
            initUI();
    }

    private void initUI() {
        setContentView(R.layout.activity_main);
        fgm = new SygicNaviFragment();
        getSupportFragmentManager().beginTransaction().add(R.id.sygicmap, fgm, null).commit();
    }

    @Override
    public void onRequestPermissionsResult(int requestCode, @NonNull String[] permissions, @NonNull int[] grantResults) {
        for(int res : grantResults) {
            if(res != PackageManager.PERMISSION_GRANTED) {
                Toast.makeText(this, "You have to allow all permissions", Toast.LENGTH_LONG).show();
                finish();
                return;
            }
        }

        // all permissions are granted
        initUI();
    }

    @Override
    protected Dialog onCreateDialog(int id) {
        Dialog dlg = fgm.onCreateDialog(id);
        if (dlg == null)
            return super.onCreateDialog(id);
        return dlg;
    }

    @Override
    protected void onPrepareDialog(int id, Dialog dialog) {
        super.onPrepareDialog(id, dialog);
        fgm.onPrepareDialog(id, dialog);
    }

    @Override
    protected void onNewIntent(Intent intent) {
        fgm.onNewIntent(intent);
    }

    @Override
    protected void onActivityResult(int requestCode, int resultCode, Intent data) {
        super.onActivityResult(requestCode, resultCode, data);
        fgm.onActivityResult(requestCode, resultCode, data);
    }

    @Override
    public boolean onKeyDown(int keyCode, KeyEvent event) {
        return fgm.onKeyDown(keyCode, event);
    }

    @Override
    public boolean onKeyUp(int keyCode, KeyEvent event) {
        return fgm.onKeyUp(keyCode, event);
    }

}
Please note
Sygic navigation requires the following 3 permissions as of the release version 13.7.4
- ACCESS_FINE_LOCATION
- WRITE_EXTERNAL_STORAGE
- READ_PHONE_STATE
As of Android 6.0 the application needs to ask those permissions explicitely. For convenience SygicLib provides the function PermissionsUtils.requestStartupPermissions as indicated above.
Please note
Consider this change of the code on the Sygic navigation fragment invocation using commitAllowingStateLoss() instead of commit() due to a bug in some Android versions
    private void initUI() {
        setContentView(R.layout.activity_main);
        fgm = new SygicNaviFragment();
        getSupportFragmentManager().beginTransaction().add(R.id.sygicmap, fgm, null).commitAllowingStateLoss();;
    }
2. Add Sygic Navigation Fragment class
The bare minimum required implementation of the SygicNaviFragment class should be as follows, i.e. defining start of navigation and setting callback reference within the onResume() method.
import com.sygic.aura.embedded.SygicFragmentSupportV4;

public class SygicNaviFragment extends SygicFragmentSupportV4 {

    @Override
    public void onResume() {
        startNavi();
        setCallback(new SygicNaviCallback(getActivity()));
        super.onResume();
    }
}
3. Add Sygic navigation callback class
The implementation of the callback class is neccessary if we want to react on some navigation events.
The callback class must be inherited from the Sygic IAPiCallback class. The basic implementation defines the constructor, through which the main activity reference is passed.
And interestingly we need to fill the mandatory onEvent method, through which various events are coming from navigation and can be processed as desired.
The example here shows the navigation exit event is captured, on which we close the whole application.
import com.sygic.aura.embedded.IApiCallback;
import com.sygic.sdk.api.events.ApiEvents;

public class SygicNaviCallback implements IApiCallback {

    private Activity mActivity;

    public SygicNaviCallback(Activity activity) {
        mActivity = activity;
    }

    @Override
    public void onEvent(final int event, final String data) {
        if(event == ApiEvents.EVENT_APP_EXIT) {
            mActivity.finish();
        }
        if(event == ApiEvents.EVENT_APP_STARTED) {
            // make sure API is only used after this event occurs
        }
    }

    @Override
    public void onServiceConnected() {
    }

    @Override
    public void onServiceDisconnected() {
    }
}
4. Add navigation operation through API call
We will call the navigation function from the button click on our designed button through its OnClick method.
Inside OnClick we read the user typed address and use it in the API call navigateToAddress. Here we use the API call using the thread mechanics.
Thus the whole functionality can be defined by extending the initUI() function as follows.
private void initUI() {
        setContentView(R.layout.activity_main);
        fgm = new SygicNaviFragment();
        getSupportFragmentManager().beginTransaction().replace(R.id.sygicmap, fgm).commit();

        final EditText address = (EditText)findViewById(R.id.edit1);

        Button btn = (Button) findViewById(R.id.button1);
        btn.setOnClickListener(new View.OnClickListener() {
            @Override
            public void onClick(View view) {
                new Thread() {
                    public void run() {
                        try {
                            ApiNavigation.navigateToAddress(address.getText().toString(), false, 0, 0);
                        } catch (GeneralException e) {
                            e.printStackTrace();
                        }
                    }
                }.start();
            }
        });

    }
Attention
Sygic navigation with its API inside the fragment requires few milliseconds initialization at the application start. It means that an unexpected crash can occur in case an API call is used immediately at the start, e.g. in early stages of OnCreate() function. It is recommended to make sure an API call is not used before the event ApiEvents.EVENT_APP_STARTED occurs (see SygicNaviCallback).
Navigation resources
Finally we also need to copy Sygic Navigation resources into device file system, i.e. typically internal or external SD card. The resources are part of the package you obtain and are contained inside the Navigation/Sygic3D/SygicLib folder. The resources need to be copied into SygicLib folder on the device.
for Android 10 and higher
The placement of the resources must be the application specific folder:
/Android/data/com.sygic.fleet/files/
    SygicLib\
      Android\
      Res\
      Maps\
For Android 9 and below
The placement of the resource folder can be at the root of the device, i.e. sdcard
sdcard\
    SygicLib\
      Android\
      Res\
      Maps\
Sygic navigation will search for the SygicLib folder to read resources.
Since the Sygic version 20.0.0 the SygicLib folder will be moved into the application specific folder with the first application start after installation.
Attention
it is important that the resources are aligned with the library version. Therefore it is strongly recommended that for an application development the resources and library are taken from the same release package.
Build and deploy application
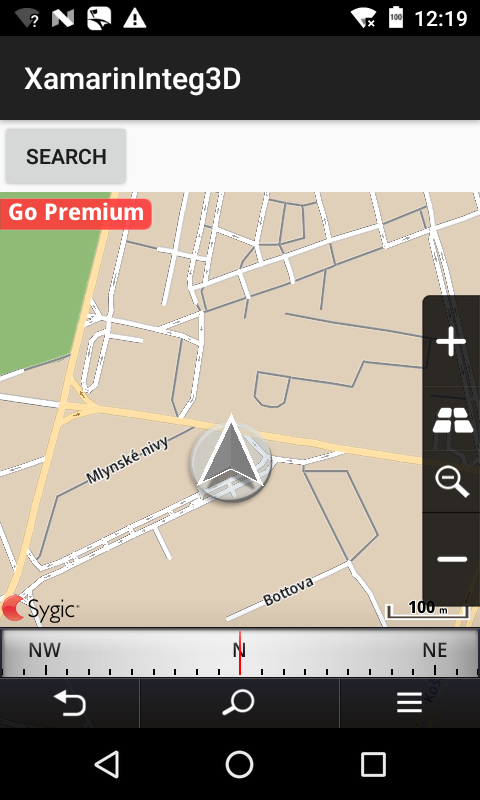
Building the application is simple as clicking on Run button in Android Studio.
The result of the build process is generation of MyApp.apk, which is normally automatically deployed on your Android device and run.
Running the application should yield the following outcome.
Full sample reference
package com.sygic.example.hello3dwiw;

import android.app.Dialog;
import android.content.Intent;
import android.content.pm.PackageManager;
import android.support.annotation.NonNull;
import android.support.v7.app.AppCompatActivity;
import android.os.Bundle;
import android.view.View;
import android.widget.Button;
import android.widget.EditText;
import android.widget.Toast;
import com.sygic.sdk.api.ApiNavigation;

import com.sygic.aura.utils.PermissionsUtils;
import com.sygic.sdk.api.exception.GeneralException;

public class MainActivity extends AppCompatActivity
{
    public static final String LOG_TAG = "hello3dwiw";

    private SygicNaviFragment fgm;

    @Override
    protected void onCreate(Bundle savedInstanceState) {
        super.onCreate(savedInstanceState);

        if(PermissionsUtils.requestStartupPermissions(this) == PackageManager.PERMISSION_GRANTED)
        {
            initUI();
        }
    }

    @Override
    public void onRequestPermissionsResult(int requestCode, @NonNull String[] permissions, @NonNull int[] grantResults) {
        for(int res : grantResults) {
            if(res != PackageManager.PERMISSION_GRANTED) {
                Toast.makeText(this, "You have to allow all permissions", Toast.LENGTH_LONG).show();
                finish();
                return;
            }
        }

        // all permissions are granted
        initUI();
    }

    private void initUI() {
        setContentView(R.layout.activity_main);
        fgm = new SygicNaviFragment();
        getSupportFragmentManager().beginTransaction().add(R.id.sygicmap, fgm, null).commit();

        final EditText address = (EditText)findViewById(R.id.edit1);

        Button btn = (Button) findViewById(R.id.button1);
        btn.setOnClickListener(new View.OnClickListener() {
            @Override
            public void onClick(View view) {
                new Thread() {
                    public void run() {
                        try {
                            ApiNavigation.navigateToAddress(address.getText().toString(), false, 0, 0);
                        } catch (GeneralException e) {
                            e.printStackTrace();
                        }
                    }
                }.start();
            }
        });

    }

    @Override
    protected Dialog onCreateDialog(int id) {
        Dialog dlg = fgm.onCreateDialog(id);
        if (dlg == null)
            return super.onCreateDialog(id);
        return dlg;
    }

    @Override
    protected void onPrepareDialog(int id, Dialog dialog) {
        super.onPrepareDialog(id, dialog);
        fgm.onPrepareDialog(id, dialog);
    }

    @Override
    protected void onNewIntent(Intent intent) {
        fgm.onNewIntent(intent);
    }

    @Override
    protected void onActivityResult(int requestCode, int resultCode, Intent data) {
        super.onActivityResult(requestCode, resultCode, data);
        fgm.onActivityResult(requestCode, resultCode, data);
    }

    @Override
    public boolean onKeyDown(int keyCode, KeyEvent event) {
        return fgm.onKeyDown(keyCode, event);
    }

    @Override
    public boolean onKeyUp(int keyCode, KeyEvent event) {
        return fgm.onKeyUp(keyCode, event);
    }
}

// ------ class SygicNaviFragment ------

package com.sygic.example.hello3dwiw;

import com.sygic.aura.embedded.SygicFragmentSupportV4;

public class SygicNaviFragment extends SygicFragmentSupportV4 {

    @Override
    public void onResume() {
        startNavi();
        setCallback(new SygicNaviCallback(getActivity()));
        super.onResume();
    }
}

// ------ class SygicNaviCallback ------

package com.sygic.example.hello3dwiw;

import android.app.Activity;
import android.util.Log;
import android.widget.Toast;

import com.sygic.aura.embedded.IApiCallback;
import com.sygic.sdk.api.events.ApiEvents;

public class SygicNaviCallback implements IApiCallback {

    private Activity mActivity;

    public SygicNaviCallback(Activity activity) {
        mActivity = activity;
    }

    @Override
    public void onEvent(final int event, final String data) {
        if(event == ApiEvents.EVENT_APP_EXIT) {
            mActivity.finish();
        }
        if(event == ApiEvents.EVENT_APP_STARTED) {
           // make sure API is only used after this event occurs
        }

        mActivity.runOnUiThread(
                new Runnable() {
                    @Override
                    public void run() {
                        String str = "Hello Event";
                        Toast.makeText(mActivity, str, Toast.LENGTH_SHORT).show();
                    }
                }
        );

    }

    @Override
    public void onServiceConnected() {
        Log.d(MainActivity.LOG_TAG, "service connected");
    }

    @Override
    public void onServiceDisconnected() {
        Log.d(MainActivity.LOG_TAG, "service disconnected");
    }
}- Previous article: Embedded integration for Sygic2D