- Developers
- Professional Navigation for Fleets
- Android
- FAQ
- Mass installation from Golden image
Mass installation from Golden image
Introduction
It is often the case that you want to preinstall navigation on many SD cards in an effective way, i.e. to perform mass installation. You can do it with a so called golden image.
This article instructs how to create a golden image if you do not have available yet. Next, it explains how to use the golden image for mass installation on your set of SD cards. As a special topis it gives the instructions how to circumvent the problem of write access on external SD cards, which Android imposed from the version 4.4. Finally the article gives few howto's and FAQ.
1. Creating golden image
Important
Golden image should be created on the same device type (100% same hardware) as are the devices for final installation.
Requirements for the installation and firewall rules
- Connect your device to a WiFi network
- Connect your device to power adapter
-
In case the navigation will be running under “Kiosk mode” or if will be used under some firewall you have to allow connection to the following servers:
Port 443, Port 80 (HTTPS,HTTP)
Product server - license activation:
DNS: productserver.sygic.com
DNS: productserver.api.sygic.comOnline traffic servers:
DNS: traffic-cdn.api.sygic.com
DNS: traffic.api.sygic.com
DNS: traffic2.sygic.com
DNS: sygictraffic2.azureedge.net
DNS: sygictraffic-cdn.azureedge.net
DNS: incidents-cdn.sygic.comOnline speedcams server:
DNS: speedcams.platform.sygic.comOffline speedcams server:
DNS: cdn-osc.sygic.comUser login servers:
DNS: auth.sygic.com
DNS: sso.sygic.com
DNS: auth.api.sygic.comNotification server
DNS: notifications.sygic.comMap updates server:
DNS: cdn.sygic.com
DNS: cdn-sygic.akamaized.net
DNS: ovh-cdn.sygic.com
(*) required only during map update processOnline maps:
DNS: om.sygic.comEshop server
DNS: eshop.sygic.com
DNS: checkout.sygic.comOnline fuel prices server:
DNS: fuelproxy.platform.sygic.com
DNS: fuel.platform.sygic.comDriver´s scoring server:
DNS: driverbehaviorapi.azurewebsites.netAnalytics:
DNS: data.flurry.com
DNS: sygic.api.infinario.comError reporting
DNS: maphub.api.here.com
DNS: reports.crashlytics.com
DNS: routing.api.sygic.comLifeguard server
DNS: gb-accounts-enduser-gw.api.sygic.comNon-TTS voices
DNS: sygicnonttsvoices-cdn.azureedge.net
DNS: nonttsvoices-cdn.sygic.com
Instructions
- Set a correct time and date on your device
- Copy a provided .apk installation file into to your device
- Install navigation software and select required maps, voices and download them (*)
- Connect your device to pc and copy the whole SygicNavigation folder from the internal memory
- Delete content.lic and footprint.info from /Maps folder
- Delete settings2.dat and other .dat files from /Android folder
- Copy settings_overload.ini file filled with required settings to /Android folder (**)
-
Now you can distribute this package to your whole fleet
(*) Maps can be provided in a separate .zip package in case your device has limited internal memory
(**) There is the possible to set required settings (language, units, vehicle attributes, etc...) into settings_overload.ini file. Please find a more detailed description at the bottom of this documentation.
2. Using golden image for mass installation
Instructions
-
Copy the files from the golden image package into a device internal memory
for Android 10 and higher
The placement of the resource files (SygicNavigation folder) must be the application specific folder,
i.e. copying with the following result:/Android/data/com.sygic.fleet/files/SygicNavigation/Android /Android/data/com.sygic.fleet/files/SygicNavigation/Maps /Android/data/com.sygic.fleet/files/SygicNavigation/Res /Android/data/com.sygic.fleet/files/SygicNavigation/version /sdcard/SygicFleet.apkFor Android 9 and below
The placement of the resource folder can be at the root of the device, i.e. sdcard.
Since the version Sygic Navigation 20.0.0 the resources will moved into application specific folder with the first applications start after installation.
If possible we recommend copying the resource files directly into the application specific folder./sdcard/SygicNavigation/Android /sdcard/SygicNavigation/Maps /sdcard/SygicNavigation/Res /sdcard/SygicNavigation/version /sdcard/SygicFleet.apkTTS voices have to be installed in a separate folder – „LoquendoTTS” located in the internal memory
From this reasons we recommend to install TTS voices later directly in navigation software through menu:
Main menu>Settings>Regional>Voice>+Spoken street names voices -
Connect to the internet
-
Run and install executable file apk
-
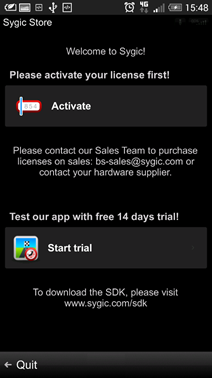
With the initial start the navigation will check whether the IMEI is already pre-activated on Sygic server. If it is so the license is automatically activated on the device and you are all set. If there is no license pre-activated on Sygic server, please press Quit button to proceed with the manual activation.

-
Press Activate button.
-
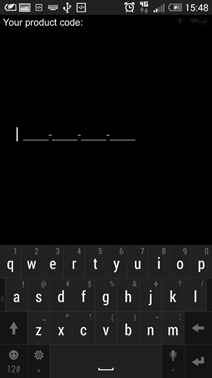
Enter the product code you have been given.
-
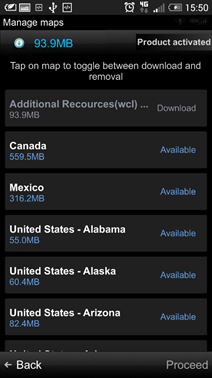
Since you already copied all map data to memory you don’t need to download any maps, just press Proceed button.
-
Done

3. How to solve write restrictions on external SDCARD
On devices with Android 4.4.x KitKat or higher Android OS due to the new write restrictions to external SDCARD (new Android Fuse Daemon) it is required to install Sygic navigation into the Sandbox folder (/Android/data/...).
Instructions
-
Copy the whole golden image content to external MicroSD card with this required folder structure:
/Android/data/com.sygic.fleet/files/SygicNavigation /Android /Maps /Res /version /SygicFleet.apk -
Insert MicroSD card into device and run installation from the .apk file
-
Important Don´t start navigation directly after installation. It is required to restart the device first in order to get the correct permission from Android OS.
If you start navigation by mistake directly after installation without performing reset, this error message will be shown.
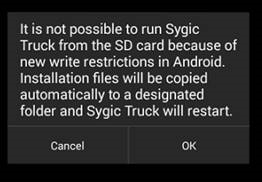
In that case please Cancel, restart the device, and run our navigation once again.
Important
If you perform uninstall process and application is located in the sandbox folder, it will be uninstalled completely with all resources. If you want to uninstall only the navigation application, use this command:
adb shell pm uninstall -k com.sygic.fleet
4. How to disable auto-update apps in Google Play
We recommend you to deny Google auto-update functionality in order to have application updates under your own control and always make some test before you will deploy a new version to the whole fleet which is using your solution. You can simply deny Google play service in your firewall or directly through these settings:
-
Open Google Play and swipe out the navigation drawer. Choose Settings
-
In the Play Store settings, tap Auto-update apps
-
You'll see three options (which can be changed at any time): Do not auto-update apps; Auto-update apps at any time. Data charges may apply; and Auto-update apps over Wi-Fi only.
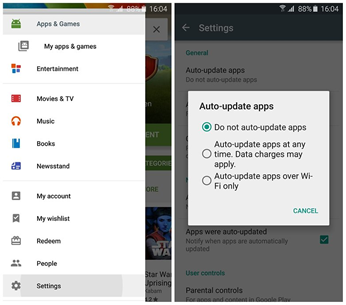
-
Choose the first one. Note that this means you will always need to manually update all apps in the future. If you still want apps to update automatically, just not on your data connection, select Auto-update apps over Wi-Fi only.
5. How to preset main settings
There is possible to preset the main settings in the special file - settings_overload.ini file
This file has to be located in a same folder where settings.ini file is located. Advantage of this file is that it won´t be replaced during the future software updates.
setting_overload.ini
6. How to install future map updates
There are available these 2 basic options how to download/install map data:
-
Through URL scheme intent, which could be integrated into some hidden button directly in your own application, or executed remotely from some MDM system:
Examples of updating a specific map or all of the maps of a purchased region:
com.sygic.aura://update|deu
com.sygic.aura://update|all
The update process can be started by some responsible person in case a device is in office/garage and it is connected to a WiFi network. -
Create the new golden image and distribute such package to SDCARDs
Important
If you decide for method of map updates through URL intent, please take into the account that each device is downloading approx. 6,3GB of map data, so we recommend you to prepare your WiFi network hardware for such big data transfers (QOS, downloading data mainly during the night) and don´t updating more than 3 devices at a same time.
7. FAQ
1. Is it possible to get the currently used truck settings through API function to show it in your own application or to dispatcher?
There is the available API function ApiOptions.changeApplicationOptions, through which is not only possible to change the required values, but also to get the currently used values.@Through this API function is possible to check parameters like:
- used type of route planning (fastest, shortest,avoid motorways)
- exact truck attributes (height, weight, length, maxSpeed, etc..)
- preset if truck restrictions are visible in a map, etc.
2. Is it possible to preset some settings and then hide this possibility to drivers (to prevent before using some unwanted or incorrect settings)?
Yes, this is possible and we really recommend this option, mainly in these 3 cases:
-
Main menu>Settings>Route planning
There is possible to preset the settings and hide that menu button through this value in menu.ini file:[menu.Settings] menu.Settings.planning=0 -
Main menu>Settings>Truck settings
[menu.Settings] menu.Settings.settingsTruck=0 -
Main menu>Settings>Connection
[menu.Settings]
menu.Settings.connection=0
Here it is also possible to use the API function ApiOnline.onlineServicesLogin to preset login into online functionality directly from your own application.
We really recommend you to hide this menu button to drivers, because if user will make registration with his own email account, your license will be moved to such email. So drivers which will use their own emails can move your license to a different device if they login with their email in it.
3. Is it possible to deny “Map downloader” and “Sygic store” to prevent before downloading the map data with big size through 3G/4G internet connection?
Yes, there is just needed to add these values into settings_overload.ini file (see above How to preset main settings):
[ApplicationSettings]
m_bMapChange=0
m_bMySygic=0- Next article: How to program back button