- Developers
- Professional Navigation for Fleets
- Android
- Getting started
- Embedded integration using Android Studio
Embedded integration using Android Studio
Introduction
In the following we will guide you through creating a simple Android application with embedding Sygic navigation engine through window in window style.
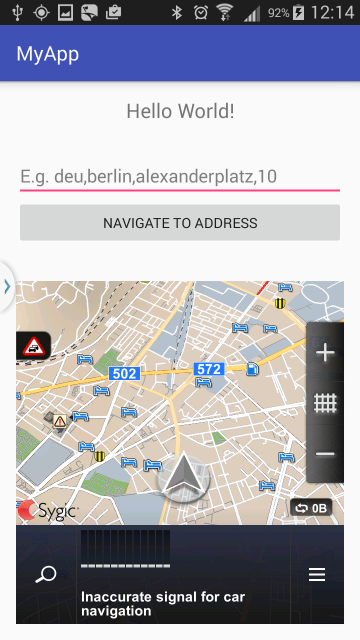
In this example we will develop a simple application, where you can type in an address string and through a custom button you can start navigation to that address.
You can download the complete demo source code from github.
Create new project
Let's start Android Studio and start the new project through Start a new Android Studio project, name the application e.g. MyApp, and name the package e.g. com.sygic.example.hello3dwiw. Let's define the minimum SDK version API 19, and let's select the template Empty Activity.
The project is automatically populated with activity class and its layout file.
Adapt gradle files
app build gradle
dependencies {
    implementation 'com.sygic.fleet:embedded-with-res:21.1.0'
}
project build gradle
allprojects {
    repositories {
        maven { url "https://public.repo.sygic.com/repository/maven-sygic-releases/" }
    }
}
Modify AndroidManifest.xml
The following modifications may be needed:
- add
tools:replace="android:icon, label, theme"into application section to resolve manifest merging conflicts - add
android:configChanges="orientation|keyboardHidden|screenSize"into activity section to disable re-creating the activity when screen orientation is changed - add intent filter for
com.sygic.aurato handle Custom URL intents
The AndroidManifest.xml could look as follows:
<?xml version="1.0" encoding="utf-8"?>
<manifest xmlns:android="http://schemas.android.com/apk/res/android"
    xmlns:tools="http://schemas.android.com/tools"
    package="com.sygic.example.wiwdemo3d">

    <application
        android:allowBackup="true"
        android:icon="@mipmap/ic_launcher"
        android:label="@string/app_name"
        android:supportsRtl="true"
        android:theme="@style/AppTheme.NoActionBar"
        tools:replace="android:icon, label, theme">

        <activity android:name=".MainActivity"
            android:configChanges="orientation|keyboardHidden|screenSize"
            android:windowSoftInputMode="adjustPan">
            <intent-filter>
                <action android:name="android.intent.action.MAIN" ></action>
                <category android:name="android.intent.category.LAUNCHER" ></category>
            </intent-filter>
            <intent-filter>
                <data android:scheme="com.sygic.aura"></data>
                <action android:name="android.intent.action.VIEW" ></action>
                <category android:name="android.intent.category.BROWSABLE" ></category>
                <category android:name="android.intent.category.DEFAULT" ></category>
            </intent-filter>
        </activity>

    </application>

</manifest>
Define graphical look
As an example of the window-in-window look we can prepare the layout in such a way, that it splits the screen into 2 segments:
- EditText for address input + Button to trigger navigation
- FrameLayout where we will place Sygic navigation as a fragment.
For source code, see activity_main.xml layout in github demo.
Code the application
Create Sygic Navigation fragment
Create fragment class inheritted from SygicFragment or SygicFragmentSupportV4. Minimal code should be as follows:
class SygicNaviFragment : SygicFragmentSupportV4() {
    override fun onResume() {
        startNavi()
        setCallback(SygicNaviCallback(requireActivity()))
        super.onResume()
    }
}
Handle Sygic navigation callbacks
The implementation of the callback class is neccessary if we want to react on some navigation events. Inherit your callback from the Sygic IAPiCallback class. onEvent method is triggered is triggered when various events occured in the navigation, e.g: application start/exit, route computed, destination reached etc.
The example here shows the navigation exit event is captured, on which we close the whole application.
class SygicNaviCallback(private val mActivity: Activity) : IApiCallback {
    override fun onEvent( event: Int, data: String?) {
        if (event == ApiEvents.EVENT_APP_EXIT) {
            mActivity.finish()
        }
        ...
    }
    ...
}
Attention
You should also handle ApiEvents.EVENT_APP_STARTED event, since it is not allowed to call any API function before this event occurs. If any API function is invoked before ApiEvents.EVENT_APP_STARTED or after ApiEvents.EVENT_APP_EXIT, your app may crash!
Request permissions
Before starting Sygic navigation, you need to have proper permissions. Usually, you don't need any special permission. You may need WRITE_EXTERNAL_STORAGE if you want to use some specific folder for your resources or maps. You may also need READ_PHONE_STATE permission if you are using IMEI as a device ID. However, in most cases all you need to do is call PermissionsUtils.requestStartupPermissions(this) which will return PackageManager.PERMISSION_GRANTED if you have all required permissions. Otherwise, permission flow is triggered and you need to handle onRequestPermissionsResult callback.
Example:
    override fun onCreate(savedInstanceState: Bundle?) {
        super.onCreate(savedInstanceState)
        if (PermissionsUtils.requestStartupPermissions(this) == PackageManager.PERMISSION_GRANTED) {
            // permissions are granted
        }
    }
    override fun onRequestPermissionsResult(requestCode: Int, permissions: Array<String>, grantResults: IntArray) {
        for (res in grantResults) {
            if (res != PackageManager.PERMISSION_GRANTED) {
                // some permission is not granted
                return
            }
        }
        // permissions are granted
    }
Please note
Some permissions will be requested by Sygic navigation itself during runtime. E.g. ACCESS_FINE_LOCATION permission will be requested when the map is shown, or WRITE_EXTERNAL_STORAGE if user decides to install maps to SD card.
Check the resources
Sygic also needs some resource files to be extracted on the storage. When using embedded-with-res artefact from Maven, you can use ResourceManager to verify the integrity of your resource files and also to update them when needed. You can call ResourceManager.sygicLibDir to get File where resources are stored.
Example:
    private fun checkSygicResources() {
        val resourceManager = ResourceManager(this, null)
        if (resourceManager.shouldUpdateResources()) {
            Toast.makeText(this, "Please wait while Sygic resources are being updated", Toast.LENGTH_LONG).show()
            resourceManager.updateResources(object : OnResultListener {
                override fun onError( errorCode: Int, message: String) {
                    Toast.makeText(this@MainActivity, "Failed to update resources: $message", Toast.LENGTH_LONG).show()
                }

                override fun onSuccess() {
                    // resources were updated successfully
                }
            })
        }
    }
Manual resources handling
If you are not using embedded-with-res artefact from Maven, you cannot use ResourceManager to handle lib resources, therefore you need to handle them by yourself. The SygicLib folder needs to be copied to an appropriate location. See the following guidelines:
-
for Android 10 and higher
The placement of the resources must be the application specific folder:/Android/data/your.package.name/files/ SygicLib\ Android\ Res\ Maps\ -
For Android 9 and below
The placement of the resource folder can be at the root of the device, i.e. sdcardsdcard\ SygicLib\ Android\ Res\ Maps\Sygic navigation will search for the SygicLib folder to read resources.
Since the Sygic version 20.0.0 the SygicLib folder will be moved into the application specific folder with the first application start after installation.
Attention
It is important that the resources are aligned with the library version. Therefore it is required that the resources and library are taken from the same release package.
Start Sygic navigation and call the API function
To start the navigation, simply display Sygic navigation fragment that we created before.
Clicking btnNavigate button will trigger Sygic API function ApiNavigation.navigateToAddress. Since all Sygic API calls are blocking, we call it in separate thread. For more robust solution, consider using HandlerThread or coroutines, but avoid doing simultanous API calls from multiple threads, since Sygic API is not thread safe.
Example:
    private fun initUI() {
        setContentView(R.layout.activity_main)

        fgm = SygicNaviFragment()
        supportFragmentManager.beginTransaction().replace(R.id.sygicmap, fgm!!).commitAllowingStateLoss()

        findViewById<Button>(R.id.btnNavigate).setOnClickListener {
            object : Thread() {
                override fun run() {
                    try {
                        val address = findViewById<EditText>(R.id.editAddress).text.toString()
                        ApiNavigation.navigateToAddress(address, false, 0, 5000)
                    } catch ( e: GeneralException) {
                        e.printStackTrace()
                    }
                }
            }.start()
        }
    }
Attention
For simplicity, this demo is not checking if ApiEvents.EVENT_APP_STARTED was triggered and therefore it could possibly crash on ApiNavigation.navigateToAddress call in some cases.
Build and test application
Run the application. At first start, resources will be extracted and maybe some permissions will be requested. To get into the map, you will also need a license.
If you run into some issues, please check also FAQ.
Running the application should yield the following outcome.
Full sample reference
See on github.
- Previous article: Standalone integration for Sygic2D
- Next article: Embedded integration for Sygic2D